Lab 11 - Qt - signals and slots copy
Qt - signals and slots
Signals and slots
The basics
Qt implements a mechanism of signals and slots. It is a tool that
allows you to manage asynchronous events (occurring in random moments
without blocking the execution of the code that waits for them) from the
program, the user or the operating system. The use of signals and slots
is very simple. Every class in Qt can implement signals, i.e. functions
emitting an event. At the same time each class can implement slots,
i.e. functions that capture and process the above signals. For example,
a QPushButton class has a clicked() signal
that is emitted when the user presses a button.
In order to handle the event from the button, in the main window
class we need to prepare a suitable slot. For this purpose, in the class
declaration we put the directive slots: with access
modifier (in this case private), and immediately below it
the declaration of the function that will handle the event:
class MainWindow : public QMainWindow {

...

private slots:
    void my_button_slot();
};
Then in the .cpp file we define our event handling
function. For now, it will remain empty:
void MainWindow::my_button_slot()
{

}
🛠🔥 Assignment 🛠🔥
- Create a new Qt Widgets Application.
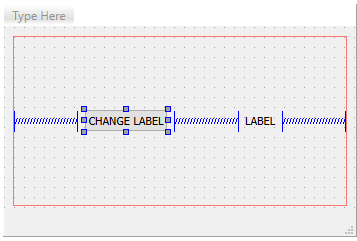
- Using a Qt Designer populate the windows with widget of types:
QPushButtonandQLabel, for compatibility with further class course do not change theobjectNameof widgets. Exemplary window layout:
- Edit files
mainwindow.cppandmainwindow.hand prepare a slot for handling the button as instructed above.
Note: During the previous classes you could notice that Qt Creator can generate the code described above for the controls placed on the form - usually it is worth to use this function, but for the demonstration of the slots mechanism we deliberately omit it.
Connecting signals to slots
Signals and slots should be connected together using a dedicated
connect(...) function. It connects two objects: the sender
(signal) and the receiver (slot). The connect must be
called only once. This call can be placed e.g. in a class constructor.
In order to connect a button pressed event with our prepared slot, it is
necessary to make a call, e.g. in MainWindow class
constructor:
MainWindow::MainWindow(QWidget *parent): QMainWindow(parent), ui(new Ui::MainWindow)
{
    ui->setupUi(this);

    connect(ui->pushButton, &QPushButton::clicked, this, &MainWindow::my_button_slot);
}
The connect function takes the following arguments in
this case:
- a pointer to the object sending the signal,
- a pointer to the prototype of the function that constitutes the signal,
- a pointer to the object receiving the signal,
- a pointer to the prototype of a function that is a slot.
Note: if we put a button called
pushButton (default name) on the form and add a slot called
on_pushButton_clicked to the class of the window containing
the button, Qt will implicitly (without using the connect
function in the code) connect the clicked signal to this
slot. To avoid this behavior (only for demonstrations), the slot is
called my_button_slot in the above examples.
🛠🔥 Assignment 🛠🔥
- In
MainWindowconstructor add a call ofconnectwhich will connect the button with previously prepared slot. - In the slot place a code which will change the content of the
QLabelto NEW TEXT AFTER CLICK, after pressing the button.
Additional information
One signal can trigger multiple slots and vice-versa - one slot can be triggered by multiple signals from different objects.
More about signals and slots can be found in the description on the Qt project subpage.
Modal dialog windows and communication using slots
Modal dialog boxes are windows that, when displayed, block access to
the main window until they are closed. They can be used to set the
configuration parameters of the program. These windows, usually inherit
from the QDialog class and contain the Ok and Cancel
buttons.
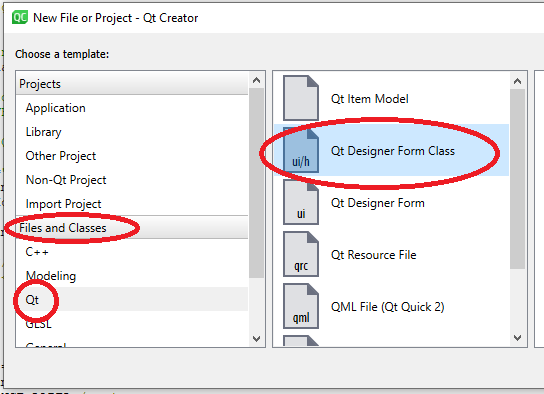
Each window has to be created as an separate class. The simplest way to do that is using a Qt Creator build-in wizard. To do that click File → New File or Project…. On the Files and Classes list choose Qt, and next Qt Designer Form Class. Confirm using Choose…:
In next window choose Dialog with Buttons Bottom and click
Next. This is followed by naming procedure of our freshly
created classes. Edit the Class name field with will cause all
the remaining fields to be filled accordingly. Confirm by clicking
Next and Finish. The project tree will be added with
.ui, .cpp and .h files.
🛠🔥 Assignment 🛠🔥
- With program’s main window:
- add
QPushButtonwith text SETTINGS, changeobjectNametosettingsButton, - add
QLabeland fill with some text, changeobjectNametodescriptionLabel.
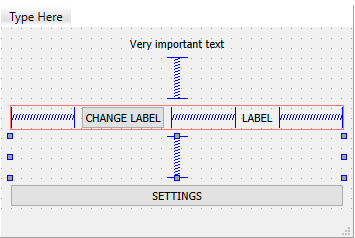
- add
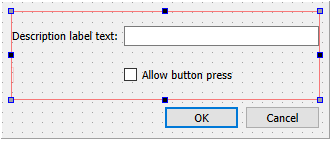
- Using a wizard add to the project a dialog window class and name it
SettingsDialog:- place all elements in the dialog inside the Form Leyout,
- add
QLineEdit, changeobjectNametodescriptionTextEdit, - add
QCheckBox, changeobjectNametobuttonEnabledCheckBox.
- Into the main window’s class add a private slot:
void open_settings(), next using aconnectmechanism connect thesettingsButtonwithopen_settings()triggering.
For the dialog creation to be possible it is needed to include its
class within the mainwindow.cpp, depending on the dialog
window class name, e.g.:
#include "settingsdialog.h"Opening of the modal window, blocking the parent window interface, can be done in following manner:
void MainWindow::open_settings()
{
    SettingsDialog dialog; // creation of the dialog window object

    dialog.exec(); // execution/showing of the window; mainwindow will hold until closing the dialog
}
🛠🔥 Assignment 🛠🔥
- Add to your program the possibility to pen the dialog window.
- Test your program.
Next step needed for making the settings window work is passing the
current settings values into it, in order to present them to the user.
There are few possible ways to to that. For example the
SettingsDialog class can implement a public method for
passing and setting the values. Another option is using the
SettingsDialog constructor.
🛠🔥 Assignment 🛠🔥
- Choose your method for passing the values into the dialog window
(public method or modification of the default constructor of the
SettingsDialog). - In order to read the current state of the button use:
ui->pushButton->isEnabled() // bool type- For reading the current
QLabeltext use:
ui->descriptionLabel->text() // QString type- In
SettingsDialogpublic method or constructor use the passed values and change the appearance ofQLineEditandQCheckBoxso they reflect the state of the main widow widgets, e.g.:
ui->buttonEnabledCheckBox->setChecked(button_enabled);
ui->descriptionTextEdit->setText(description_text);
One of the options to catch the window closing event is to use the
implicitly placed OK and Cancel buttons. If the dialog
was created using a wizard with Dialog with Buttons Bottom,
this caused the Qt Designer to automatically add an
QDialogButtonBox widget with objectName of
buttonBox. QDialogButtonBox object emits and
QDialogButtonBox::accepted() signal when user clicks
OK.
🛠🔥 Assignment 🛠🔥
- In
SettingsDialogadd private slotvoid buttonBoxClicked()which will be used to handle the OK click event. - In
SettingsDialogconstructor make a connection betweenacceptedsignal and newly created slot:
connect(ui->buttonBox, &QDialogButtonBox::accepted, this, &SettingsDialog::buttonBoxClicked);At this point, after hitting OK the dialog window will be
closed, but modification of the elements in the settings dialog will not
influence anything on the main window, the settings has not been yet
passed to MainWindow. One option to pass the information
between classes (SettingsDialog to MainWindow
in this case) is also using signals/slots. SettingsDialog
should emit a signal that includes all the parameters of the object in
the form, which than have to be captured. In Qt all the object
inheriting QObject can emit a signal using a
emit keyword. In order to do that we have to add a
signals: directive into the class declaration, a below it a
declaration of the signal together with the parameters to be passed,
e.g.:
class SettingsDialog : public QDialog
{
    /****/

signals:
    void changesAccepted(bool button_enabled, QString description_text);

    /****/
};
🛠🔥 Assignment 🛠🔥
- To
SettingsDialogclass add signal:
void changesAccepted(bool button_enabled, QString description_text);- Inside
SettingsDialog::buttonBoxClicked()method (triggered when pressing OK) place achangesAcceptedsignal emission with proper parameters:
void SettingsDialog::buttonBoxClicked()
{
    emit changesAccepted(ui->buttonEnabledCheckBox->isChecked(), ui->descriptionTextEdit->text());
}
The last step is to capture the signal in the main window, in order
to to that in MainWindow class a private slot is needed,
which will be connected to the signal emitted by
SettingsDialog, and then properly served. It is crucial for
the slot to have the same parameter list as the corresponding signal.
The order and types of the arguments are important, name is
unrestricted.
🛠🔥 Assignment 🛠🔥
- In
MainWindowclass add the declaration and implementation of the private slot with proper parameter list. In the implementation handle the changes of interface based on passed arguments:
//mainwindow.h
private slots:
    void changeValues(bool button_enabled, QString description_text);
//mainwindow.cpp
void MainWindow::changeValues(bool button_enabled, QString description_text)
{
ui->pushButton->setEnabled(button_enabled);
ui->descriptionLabel->setText(description_text);
}- In
MainWindow::open_settings()slot after the creation of the dialog window object, and before its execution, addconnectthat will connect signal from theSettingsDialogto the newly created slot inMainWindow:
void MainWindow::open_settings()
{
    SettingsDialog dialog(ui->pushButton->isEnabled(), ui->descriptionLabel->text());

    connect(&dialog, &SettingsDialog::changesAccepted, this, &MainWindow::changeValues);

    dialog.exec();
}- Test the settings mechanism.
QMenu and QAction
For classes inheriting from QMainWindow (usually
describing the main window of the program), a user menu
(QMenu) and a toolbar are assigned by default. The menu
structure and toolbar can be created from Qt Designer:
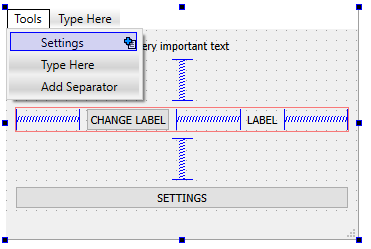
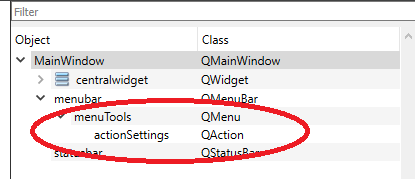
🛠🔥 Assignment 🛠🔥
- Add Tools menu with Settings entry to your program.
Adding entries do the QMenu will automatically cause a
creation of QAction object with generated names based on
the text entered:
In an easy way we can assign an icon to the QAction. For
doing that we have to highlight the QAction object we want
to edit and than modify the icon field be choosing Choose
File…. You have to remember that when using an external file it
will not be included into the binary .exe, thus the file
has to be placed in the execution folder of the program. In case of Qt
Creator the programs are executed in the corresponding
build folder for the project.
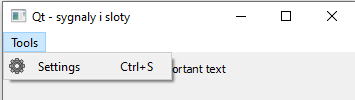
Easy way to define a keyboard shortcut exist. Pressing a keyboard shortcut will cause the same action as clicking the menu entry. For defining edit the shortcut field:

Clicking the menu entry (and using a keyboard shortcut) will emit a
QAction::triggered signal, which can be connected with a
slot using a connect.
🛠🔥 Assignment 🛠🔥
- For
acctionSettingsobject:- add icon: settings.png (remmember to place it in the build folder of the program),
- add Ctrl + S keyboard shortcut.
- In
MainWindowconstructor add a connection betweenQAction::triggeredfromacctionSettingsandMainWindow::open_settingsslot. - Test the various setting dialog’s opening methods.
Final assignments 🛠🔥
Text editor
Use Qt to write a simple text editor.
The editor should allow you to:
- create a new document,
- open a file,
- overwrite the file,
- save the file as a new one.
Add appropriate widgets to the window and actions to the File menu.
Use the QFileDialog class to select files.
Load the entire contents of the open file into the text window (the QFile class is used for file operations).
Allow to overwrite the file (save under the same path) or save it as a new file.
Add Find and replace to the program. Create a window class (File → New File or Project → Qt → Qt Designer Form Class → Widget) where you can enter two strings of characters (source and target) and two buttons: Replace and Replace all.
Add the Edit menu with the Find and replace action.
Connect their signals to the slots in the main window and implement the required functionality.
You can find some implementation details in the Application Example.
Authors: Tomasz Mańkowski, Jakub Tomczyński, Dominik Pieczyński