11 - EKF
Robotics I
Poznan University of Technology, Institute of Robotics and Machine Intelligence
![]()
Laboratory 11 - EKF for localization
Goals
By the end of this lab you will:
- Understand how EKF works.
- Configure the EKF for localization with multi-sensory input.
- Understand how we deal with outliers in EKF.
Resources
Note: All code must run inside Docker container.
Preparation
- Pull the latest version of the ROS2 Jazzy Docker image:
docker pull osrf/ros:jazzy-desktop- Run the Docker container with the following script.: >
Note: Make sure to replace
CONTAINER_NAMEwith your student ID number.
  IMAGE_NAME="osrf/ros:jazzy-desktop"
  CONTAINER_NAME="" # student ID number

  xhost +local:root

  XAUTH=/tmp/.docker.xauth
  if [ ! -f $XAUTH ]
  then
      xauth_list=$(xauth nlist :0 | sed -e 's/^..../ffff/')
      if [ ! -z "$xauth_list" ]
      then
          echo $xauth_list | xauth -f $XAUTH nmerge -
      else
          touch $XAUTH
      fi
      chmod a+r $XAUTH
  fi

  docker stop $CONTAINER_NAME || true && docker rm $CONTAINER_NAME || true

  docker run -it \
      --env="DISPLAY=$DISPLAY" \
      --env="QT_X11_NO_MITSHM=1" \
      --env="ROS_AUTOMATIC_DISCOVERY_RANGE=LOCALHOST" \
      --env="ROS_LOCALHOST_ONLY=1" \
      --volume="/tmp/.X11-unix:/tmp/.X11-unix:rw" \
      --env="XAUTHORITY=$XAUTH" \
      --volume="$XAUTH:$XAUTH" \
      --privileged \
      --network=host \
      --shm-size=1024m \
      --name="$CONTAINER_NAME" \
      $IMAGE_NAME \
bash- After running the above command, you should be inside the container. Now let’s configure the environment:
apt update
apt-get install ros-jazzy-robot-localization
echo "source /opt/ros/jazzy/setup.bash" >> ~/.bashrc
mkdir -p ~/ros2_ws/src
cd ~/ros2_ws/src
git clone https://github.com/MichalNowicki/EKFlearning.git
cd ~/ros2_ws
source /opt/ros/jazzy/setup.bash
colcon build
source ~/ros2_ws/install/setup.bash
echo "source ~/ros2_ws/install/setup.bash" >> ~/.bashrc
Tip: If you encounter issues when installing
robot_localizationthen please follow the suggestion at github.
Tip: You can use
colcon build --symlink-installto create symbolic links to the source files instead of copying them. This way, you can edit the source files directly in thesrcdirectory without needing to rebuild the entire workspace. C++ code still needs to be compiled.
EKF Overview
We already got to know the linear Kalman Filter during the tracking
classes. EKF extends this capability to work with non-linear functions,
that are linearized during computation. Today we are going to work with
non-linear localization system for turtle. EKF, similarly to KF, has two
phases: prediction when we try to estimate the next state and update
when we accumulate information from sensors. Today, we are going to play
with popular EKF implemention in ROS2, called robot_localization.
robot_localization has some great practical guide.
Key Concepts
State:
The library assumes that we want to track 15 values: position (XYZ), orientation (roll, pitch, yaw), linear velocities, angular velocities, and linear accelerations.Prediction:
By default, it uses just the internal state to predict the next state. But, it is also possible to further improve it by taking into account the control input.Update:
Sensor measurements to take into account need to be configured in config file. Typical ROS2 messages (Odometry, IMU, Pose) are supported. We need to specify which parts of the state estimate do we want to update with measurements from a given sensor.Advanced options:
Library simplifies the usage of the EKF but there are many advanced parametrizations that can be enabled to improve the performance of the EKF on data from physical sensors.
Why robot_localization?
It is popular, implements most popular EKF tricks, is validaited with unit tests, and is proven by the community.
How to use it?
By properly configuring the input from sensors in config file, and validating the observed improvements. No need to implement the raw EKF equations.
Task 1: Launch the turtle
During today’s class, we will work with a modified turtle that we can accelerate and deaccelerate.
- Launch the turtle:
ros2 launch kalman_class run_sim.launch.pyYou should see the scene with two turtles.
- In separate terminal, launch node to control the turtle using the keyboard:
ros2 run turtlesim turtle_teleop_keyNow, you should be able to move the turtle from the center using arrows and stop on space. This turtle represents our true, reference pose. The second turtle in the bottom left corner will represent our best estimate based on the sensors and it should not move right now.
- Record a bag file with some steering commands sent to the turtle. Avoid hitting the walls. We will use this recording to compare different configurations of our EKF and the same control input will tell us what are the differences in performance between these approaches.
Expected Outcome: bag file containing steering commands to move the turtle.
Task 2: EKF using GPS
The turtle for today’s class is equipped with multiple sensors that
are noisy. Our goal is to help it localize so it can go back home. The
run_sim.launch.py from previous task spawns also a second
turtle (left bottom corner) that is our best guess from EKF where our
turtle is in the world. Our task right now is to properly configure EKF
by making modifications to the config file ekf.yaml found
inside the kalman_class package:
We need to properly set our uncertainty where this turtle is at the start.
robot_localizationassumes state with zeros, which corresponds to the bottom-left corner of our turtle view. Is it properly set based on what we know? How we should configure it inside theekf.yamlconfig?We need to connect EKF to use information about GPS. What topic provides this information? What type of information do we get from GPS?
Once the changes have been made, you should start the turtle:
ros2 launch kalman_class run_sim.launch.pyand then replay your recorded data to see how the real turtle (from the center, gray line) is moving compared to the our best EKF guess (from bottom left, yellow line). You should see something similar to:
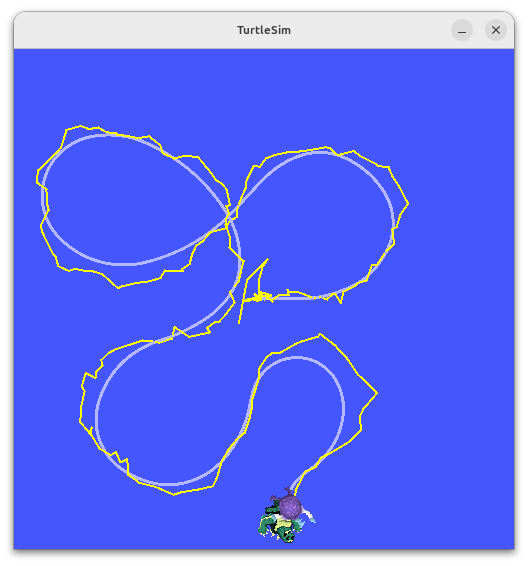
Real motion
(gray) compared to the estiamted trajectory based on noisy GPS (yellow).
Source: Own materials
Expected Outcome: Take a screenshot of the window to
later upload to eKursy. Save also the config file
(ekf.yaml) for future upload.
Task 3: EKF using GPS and AHRS
Even though GPS provides some nice estimate, you probably have seen that sometimes turtle is randomly rotating aroud. Therefore, we will add AHRS providing orientation in order to improve our results. Do the changes. You should expect to see something similar to:
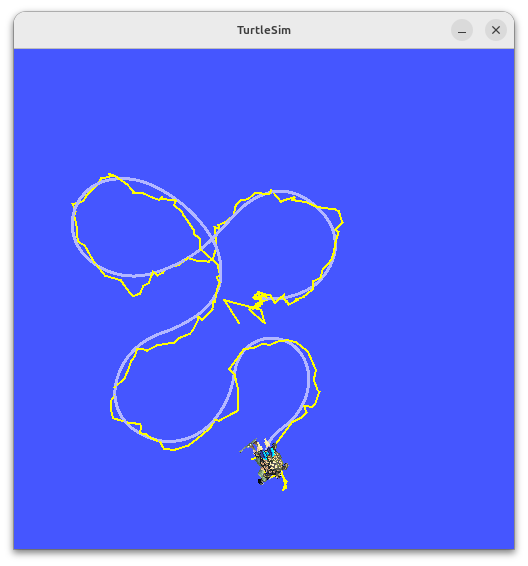
Real
motion (gray) compared to the estiamted trajectory based on noisy GPS
and AHRS (yellow). Source: Own materials
Expected Outcome: Take a screenshot of the window to
later upload to eKursy. Save also the config file
(ekf.yaml) for future upload.
Task 4: EKF using GPS, AHRS, and odometry
We can still improve. Now, you should take into account information from odometry, which connects consecutive poses. Do the changes. You should expect to see something similar to:
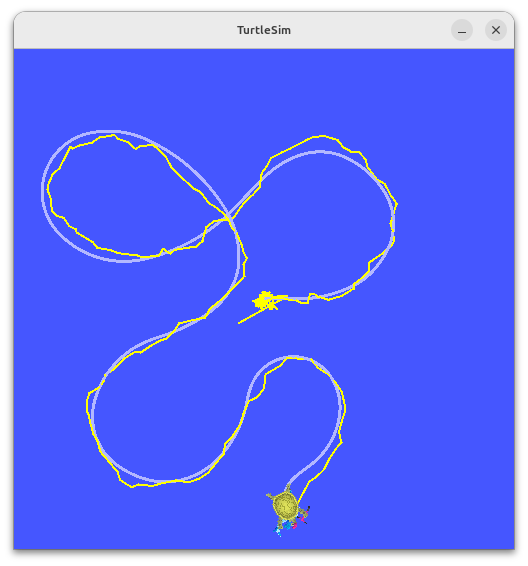
Real motion
(gray) compared to the estiamted trajectory based on noisy GPS, AHRS,
and odometry (yellow). Source: Own materials
Expected Outcome: Take a screenshot of the window to
later upload to eKursy. Save also the config file
(ekf.yaml) for future upload.
Task 5: EKF and position with outliers
In previous tasks, we used sensors with some Gaussian noise (that we
knew) and EKF was able to nicely handle the noise. Unfortunately, it is
not the case for the camera sensor that can provde accurate position
estimates by observing some artificial markers but can also have some
wrong measurements (outliers). There are not many outliers but even a
single one can make EKF diverge. Configure your EKF from previous task
to handle an input from camera that may contain outliers. Use existing
capabilities of the robot_localiation package.
You should expect to see something similar to:
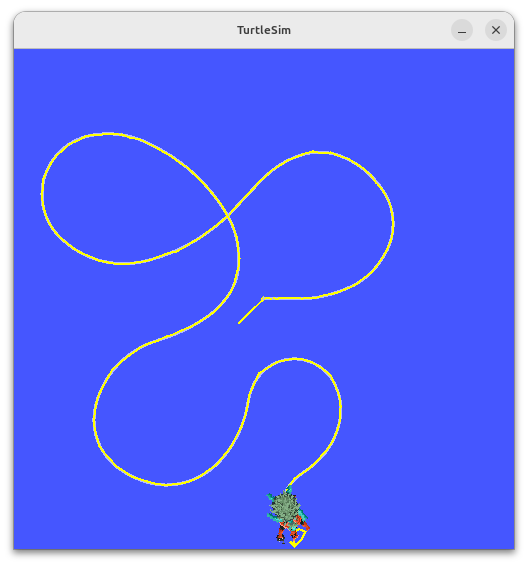
Real
motion (gray) compared to the estiamted trajectory based on noisy GPS,
AHRS, odometry, and camera (yellow). Source: Own materials
Expected Outcome: Take a screenshot of the window to
later upload to eKursy. Save also the config file
(ekf.yaml) for future upload.
To pass the course, you need to upload the following files to the eKursy platform
- a screenshot presenting estimated trajectory based on GPS and
associated config renamed as
ekf_gps.yaml - a screenshot presenting estimated trajectory based on GPS and AHRS,
and associated config renamed as
ekf_gps_ahrs.yaml - a screenshot presenting estimated trajectory based on GPS, AHRS, and
odometry, and associated config renamed as
ekf_gps_ahrs_odometry.yaml - a screenshot presenting estimated trajectory based on accurate
camera with outliers, GPS, AHRS, and odometry, and associated config
renamed as
ekf_all.yaml